Amy Carter Interior Design

Week 1-Day 1 April 2018
During the morning of my first day at Neville Johnson it began with a tour around the offices, seeing where I would be working and what the office space was like, and how they worked. This tour then continued into the factory where I was shown how they make the products they design and the different processes each product goes through before being sent out and fitted into a clients home. After the tour around the company I then had two inductions that were necessary to have before I could official start work at Neville Johnson. The first induction was a 'Welcome to the Team' induction which consisted of being told more about how the company works and what they do, who the team members are, and about the different sections of the company which are Neville Johnson, Tom Howley and The London Door Company. This was then followed by a quick Healthy and Safety induction which took me through their H&S policies for both in the office area and the factory, and a fire safety induction and what to do in case one happens.
During my time at Neville Johnson I will be working with the team of people who design the showroom sets and make the photosets for clients to see how their house would look once it has been redesigned. The I am working with gave me a brief to follow in weeks 2 and 3 which outlines that I will be designing a contemporary library/TV lounge by creating a mood board, a set of plans and elevations and a set of visualisations/photoset.
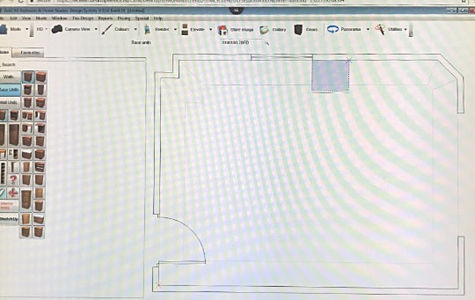
The piece of software the company uses is ArtiCAD which I have never used before so in the afternoon I started to learn how to use ArtiCAD as I will need to use this for my individual project. The team set me up with a set of ArtiCAD tutorial videos and watch and follow to learn how to use the system. ArtiCAD is really quick and easy for creating digital floor plans that can then be turned into renders. Based from the tutorials I watched I built a floor plan of a room in ArtiCAD and learnt about the different features of the software and how to make a room, add in furniture, lighting, colours and textures and how to dress it so that it would then be ready to make a render.
Week 1-Day 2 4th April 2018
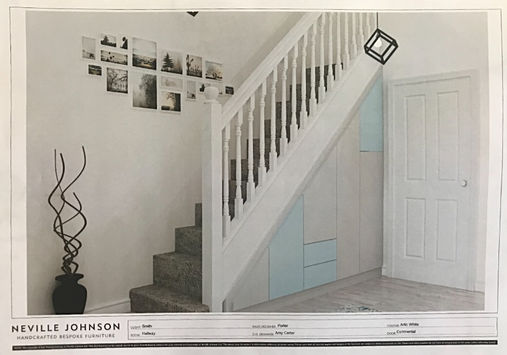
On day two I spent the morning with a member of the team I am working with going through SketchUp and learning how they use it and what they use it for as this is another software system I will need to use for my individual brief. To effectively show and teach me how to use SketchUp and how to build their furniture in SketchUp I sat alongside one of the team members who was building a staircase with a set of cupboards/storage space underneath the stairs. To learn how to build their furniture in SketchUp I sat alongside the team member on the laptop I had been provided and I followed her step by step and built the three different sections of the staircase I would need to make a complete model of it. I started off by making a model of the internals of the storage space, then a model of the outside of the storage space with the doors on and finally I then built the actual stairs and banister. Once I had finished building the SketchUp models I then coloured each section a different colour so that once I had placed the model into ArtiCAD I would be able to easily identify which sections were going to be what colour or material.


After this I was then given the floor plans of the room the stairs would be going in so that I could use this as a reference to build the floor plans in ArtiCAD. Once I had built the floor plans and put in the doors and windows I then downloaded my SketchUp files of the stairs, storage internals and the cupboard doors into ArtiCAD, placed them into the correct section of the room and to make sure the storage units would appear under the stairs I simple just had to lay the models over each other in the correct order. Once I had the room built and stairs in I then began to dress the room starting with the colours/textures/materials of the walls, floors, doors and ceiling. Then I moved onto colouring the stairs, banister and the doors of the storage unit. All of this is done in order to be able to make a realistic HD render of the room I had designed and by adding colours, textures and materials this makes it appear more realistic when rendered. To enhance the render I then start adding some downlighting to the room and dressing it by adding items such as pendant lights, photographs on the wall and more. The last final touch I was shown the enhance the renders even further was how to change the sunlight levels that can be seen through windows or glass on the door. Once I was happy with the outcome of my render I then put the render into Photoshop. Once I had it in Photoshop a member of the team helped me edit the image to brighten it up, and make it clearer and crisper and this was done by using the blur tool to get rid of any imperfections and weird shadows. Then final I played around with brightness, hue and saturation until I was with the final result.
Week 1-Day 3 5th April 2018
During the morning I was tasked with drawing and designing a new job for a current client from start to finish using SketchUp and ArtiCAD to build the furniture and the room based off of the dimensions and specs of a clients job in order to practice the software further and to see how I managed using the software systems on my own to do a whole job. To do this I started of by constructing a set of base units based off of the dimensions and specs for the new base units that the client wants designing and fitting. Once I had built the base units in SketchUp I then switched over to ArtiCAD to begin building the clients room that these base units will be placed in. Then once I had finished constructing the room in ArtiCAD I was then able to import the base units and place them in the correct position in the room, and then to make sure the base units were correct and were in the correct position I did a quick 'photo realism' render.


After this I then I moved on to doing a new job from start to finish in ArtiCAD as the team thought this would be a more exciting and nicer job for me to build and that it would give me more to play around with when it come to dressing the room. Again I started by building the room in ArtiCAD based off a set of plans that gave me the dimension and specs for the walls, windows, doors and ceiling height. Once I had built the room I then went on to colouring the walls and carpet based off of the pictures of the clients room as they specified that they will be keeping the wall colour and carpet the same colour which was a duck egg carpet and a soft lime wall. To make sure the colours of these two elements match the colours in the photos I went onto google to find high resolution swatches of these colours and then imported them into ArtiCAD so I was then able to edit those sections of my room. To make sure the colours perfectly matched I then edited the colours by adjusting the hues, saturation and brightness until I was happy with the match. After I was happy with the colour match I then switched over the SketchUp to create the two different sets of patio doors featured in the client photos as they would also be keeping these. Once I had built them to the correct scale and design I imported them back into ArtiCAD and placed them into the correct sections of the room. After I had finished building the structure of the room and adding the colours I then started adding the furniture that was listed on the specs sheet. To do this I had to simply search through the Neville Johnson furniture database and select the pieces I needed which would the import them into the room and then all I had to so place them into the correct position. I then continued to edit the room by changing the colours/textures/materials of the furniture/base units; and then I began to dress the room by adding in lights, sofas and rugs that were similar to those of the clients.


Week 1-Day 4 6th April 2018
During the morning I finished off the job that I had began yesterday by finishing dressing the room to make it look better and more realistic by placing objects/items, similar to those of the clients or that were in a similar style to the clients; for example, placing books in some of the cupboards and some ornate ornaments in some of the other cupboards. The room its self is a rather colourful and bright room so I was advised by the team that with a job like this it works best to dress the room in neutral colours like whites, creams, greys etc. Once I had finished dressing and lighting the room I then rendered and saved another completed project.
After this I started on another job, which had me going through the process of building furniture in SketchUp, building the room in ArtiCAD, importing the furniture into the room, and then colouring, dressing and lighting the room and final rendering it. For this particular project I was tasked rebuilding a furniture set that has already been designed by Neville Johnson as practice which was a walk-in wardrobe and to build this I used the specs and dimensions to build it in SketchUp. Then once I had built the furniture and placed it into the room I had built in ArtiCAD I then had to add the materials/textures to the wardrobe which for this job was very specific. The handles and rails were chrome, the mirrors were 'mirror-silver' and the woodgrain was 'Premium White Larch'. Then I went on to adding some down lights and the dressing the room with clothes, shoes, bags etc.


